Migrating the website from XAMPP localhost to the Web

Once the full website is all done, the next step is to migrate the site from localhost to the web server.

First step is to back up database and all files just in case something goes wrong.
Turn on XAMPP and go to phpMyAdmin –
1

2

Log in to the server and create a new file where all files will be stored –
1

2

Once the folder is created, open the folder and click on ‘Upload’. There is only one file possible to select therefore, go to the actual folder and zip all files (not full folder just files!). This is because if full folder was zipped, ending of the URL address would be ‘wp_client_wp’ and this is not correct. So if only files are zipped, ending of the URL address will be ‘wp_client’ as it is required.

Once the files are zipped, upload it to the server –
4

Click ‘Go Back’ and there is the zip file –
3

Extract the zip file –
6

7

Once the file is extracted, delete the zip file to avoid hacking into the site –
9

Next step is to create database on the server in phpMyAdmin –

Log in to My cPanel and click on ‘MySQL Databases’
Untitled

Step 1 – Setting up a database

After clicking on ‘MySQL Databases’ option, this window will appear –
1

Choose name of database and click ‘Create Database’. Confirmation window will appear saying that database was created –
2

Click ‘Back’ and the main screen will appear.

Once database is created, username and password needs to be created for database.
5

Always use ‘Password Generator’ for safeness, it is hard to hack! Make sure that generated password is copied and saved somewhere safe.
4

After creating username and password for the database, user needs to be added to the database.
7

After clicking ‘add’, the window with privileges will appear (what user can and cannot do in database). By clicking them all, user has full control of database.
9

Final stage screen looks like this –
10

Once the database is created, go back to ‘File Manager’, find ‘wp-config.php file’ and click ‘Code Editor’ –
10

Add password, username and database name for the new created database and save changes –

12

Then go to phpMyAdmin in localhost and export database again but with different settings. Click on ‘Custom export method’ –
15

Scroll down and tick ‘View output as text’, then click ‘Go’ –
16

This option will output the full database in text so select it all and copy –

17

Then go to phpMyAdmin on the server and find new database that just been created. Click on the title and then ‘SQL’. Paste all the text in there and click ‘Go’ –
18

This way, the full database from localhost just has been imported to the database on the server. Click on ‘Structure’ and check if all tables and content are there –
19

What is needed to do now is to change and update WordPress URLs in new database as at the moment, all URL are set up to localhost which is not needed anymore. This is an example of the code that is needed to rewite URLs –
4

(Source: http://wpbeaches.com/updating-wordpress-mysql-database-after-moving-to-a-new-url/)

Copy and paste the code into text editor and change URLs. Where it sayshttp://www.oldurl’ – replace that with http://localhost/WP’ and where it sayshttp://www.newurl’ – replace is with http://www.veronikalesnakova.co.uk/wp_client’ –
20

Once the URLs are all changed, copy the code and paste it into ‘SQL’ and click ‘Go’ –
21

22

Now it is all done and migrated.

Type the URL of the website into the browser and see the result –
23

There is and error that means that sections of the site are not loading in right order therefore, this line of code needs to be added into ‘functions.php’ –
5

(Source: http://php.net/manual/en/function.ob-start.php)

Open ‘functions.php’ file on the server and add ‘ob_start();’ at the top of the code –

24

This way all sections of the website i.e. header, footer etc. will load in right order.

NOTE: This is not the right way of adding code into the file! It should be never done on the server but in files and then uploaded to the server. However, for saving time, this time the code was changed on the server.

Refresh the website and it is all done and working!

However, after clicking on the navigation, another pages are not visible and it says  that the files are not there. To fix that, go to the Admin section of the website > Settings > Permalinks > Save Changes.
All pages are now loaded and saved and the full website is functioning perfectly fine.

(Source: https://premium.wpmudev.org/blog/migrate-wordpress-xampp-localhost-web/?utm_campaign=Roost&utm_source=Roost&utm_medium=push)

Displaying images with WordPress and Pods

Research is needed to find out how how to display multiple images as the code that has been used is not working –
369

While researching, this post from Pods forum came up – http://pods.io/forums/topic/multiple-image-field-in-a-custom-post-type/#post-176683 and it has been used as an example of the code –

370


This code is not working quite well as it is picking up images but not displaying them –
364

Adjusting of code is needed.

365

Source: http://pastebin.com/A0Dkwtqu

366

Images are displayed in slideshow however, some images are displayed in full size which is stretching on full page. This will need to be sorted out.

Research about automatic re-sizing of images in WordPress

The client needs to be able to upload any image size and it will be automatically re-sized to requested size. This is done in CSS.

At the moment, CSS of the image is –
img { max-width: 100%; height: auto; }

Change this to –
img { max-width: 1120px; height: auto; }
Height always need to be set to auto, in case the image is a different aspect ratio.

Go to ‘single-gallery.php’ file and delete width and height from image.

Result

It is still doing the same thing, however images are re-sized a bit.

367

Another look into the code needs to be done in order to find out why it is still displaying images this way.

In ‘single-gallery.php’ file, there is no class added to the image. This is the mistake –
echo ‘<img alt=”” class=”slider-image” src=”‘ . pods_image( $main_image, ‘main_image’ ) . ‘”/>’;

and in CSS add – .slider-image { max-width: 1120px; height: auto; }

Then change back details from – img { max-width: 1120px; height: auto; } to img { max-width: 100%; height: auto; } as it was before because this does not need changing.

Refresh and it should work.

Unfortunately, it was doing the same thing therefore inspection in Google Chrome is needed to find out why it is doing it.

Solution

Previous code was done right and it was displaying exactly how it was coded. However, CSS code needs to be swapped around to – .slider-image { max-width: auto; height: 600px; } !

This is all and now it is displaying all images correctly!
368

Because of working with responsive images, this little bit of code needs to be added into ‘single-gallery.php’ file to make sure that all images will be displayed in the right size on the screen –

371

Creating Gallery with WordPress and Pods

The gallery section is one of the most important features of the website because users will have ability to share images of their pets with other members. Therefore, this section is going to be crucial.

Creating right Pod

Before any pod has been created, planning of functions of gallery had to be done.
Features of gallery

  1. Title
  2. Summary
  3. Location of event
  4. Event date
  5. Main images 1120 x 600
  6. Thumbnails 400 x 400

With this in mind, decision to create two separate pods with relationship between each other has been made.

However, while creating those two pods, finding out that this would work with only one pod has been made.

This is what the pod looks like –
353

After further research about creating gallery in WordPress, another way of creating thumbnails was discovered.
This is done by WordPress automatically creating thumbnails from chosen image and re-sizing it according to settings.

This is done by activating ‘Featured Image’ in ‘functions.php’ file –
355

Then go to Pods Admin > Gallery > Advanced Options > Support – tick ‘Featured Image’ option. Then save the pod and go to Gallery > Add New. In there, Featured Image should be now activated in widgets panel on right side –

356

However, it is not showing there. Another option to activate it, is to click on ‘Screen Options’ on the same page and activate it there –

357

However, it is not showing there either.

After further research about Featured Image option, conclusion not to use this feature has been made as it has let downs such as –

  1. possibility to stretch chosen image to wrong size therefore not looking appropriate for the website

Decision to let the client upload thumbnails has been made to avoid this problem.

Creating Gallery posts

Next step was to create all gallery posts in order to create gallery –
358

Once that was done, back end side of the gallery is all done. Now it is time to focus on code in order to display all information from the gallery.

Code

Two files are needed in order to create gallery –

  1. archive-gallery.php – front page with all thumbnails
  2. content-gallery.php – page displaying actual images and all information after clicking on thumbnail on previous page

archive-gallery.php

This is the code that needs to be in archive-gallery.php –
359

Loop is created in order to display all thumbnails. To link content-gallery.php file so after clicking on thumbnail, it takes users to full gallery page, ‘get_template_part()‘ function needs to be used. However, after adding this code in, it is not working right as instead of thumbnails, it is displaying actual content of gallery. This is not right and further research is needed.

Solution

After research about ‘get_template_part()‘ function, it was realised that this function is not possible to use in this case as there would have to be a file called ‘single.php’ in order to make this work. This is not possible because ‘single.php’ file is already created and used for the blog page.

This means that ‘get_permalink()’ function needs to be used in this case.

Add $post_id = $type_of_pod->field(‘id’); with rest of the variables and echo it out by adding <a href=”‘<?php echo get_permalink($post_id) ; ?>” </a>. This is all done and linked now to specific gallery page i.e. Boxfit.

While research about  ‘get_template_part()‘ function, finding out that content-gallery.php file needs to be renamed to single-gallery.php.

Working with single-gallery.php file

The php code in ‘single-gallery.php’ file is more or less the same than in ‘archive-gallery.php‘ file.
However, after clicking on certain thumbnail, it is displaying gallery content from all posts rather than specific chosen one –
354

The URL is right as it is showing that i.e. Boxfit has been chosen, but all content is displayed.

This needs to be fixed by adding ‘$pod = pods( ‘Gallery’, get_the_id() ); ‘ in order to tell the code to display specific gallery content by ID.

However, old pap code is being used to display Pods content, therefore this needs to be replaced with new code to make it work. This is an example the is going to be used and old code is going to be implemented into it –

360

(Source: https://gist.github.com/Shelob9/7832561#file-2-related-fields-example-php)

Old code is using camel case which looks like ‘getTotalRows’ and new code is not using that. It is recommended to use new code to avoid future break down of the site just in case Pods decide to get rid off camel case.

After adding new code, it is displaying nothing on the website –
361

Solution

Solution to displaying specific content of the gallery is to delete –
362

and end closing curly brackets as loop is not needed because only one content is needed to be displayed.

363

Next step is to display actual images.

Creating ‘Training Times’ section with WordPress/relationship databases

This is what ‘Training times’ section looks like static –

7YClE2aF

Next step is to turn this static section into dynamic with WordPress.

First of all, this section will be created with Pods therefore decision on what the structure of Pods is going to be like, needs to be made.

First thought about the structure of Pod

Create a Pod called ‘training times’ and then in there create fields such as start time, end time and session.

332

Then go to actual pod and create Monday, Tuesday etc. and assign start time, end time and session to days of the week.

orYLm-SU

However, this initial thought about the structure of Pod has a problem as there are more times and sessions in one day (most of them are 3 different sessions). Therefore this is not going to work. Another potential idea will be to create more start – end time and session (all together 3 for each day).

After further thinking, conclusion was made that this is also not a good way of solving the structure out as no one can guarantee that the club is going to have maximum of three sessions per day, i.e. the club may decide to run a 4th session.

Next solution would be to create two Pods with a relationship (relational databases).

Creating Pods with a relationship (relational databases)

There are relationships like

  1. one to one – one order may have one invoice
  2. one to many – one person may have many orders
  3. many to many –  the same session running on multiple weekdays

This section needs to have one to many relationship as one day needs to have many sessions. Even on the days were there is one session, it will still be a one to many because it has the possibility to have many sessions.

(Source: http://www.techrepublic.com/article/relational-databases-defining-relationships-between-database-tables/)

Next step is to create two Pods as one weekday will have many sessions –

  1. Weekdays
  2. Sessions

In ‘Weekdays’ pod create field called ‘Weekdays’ and in ‘Sessions’ pod create field called ‘Weekdays’ too. Then link them through relationship.

lQc4j18x

By linking them through relationship, one to many relation has been created. i.e. one weekday has many sessions.

‘Start time’ and ‘End time’ has been created in ‘Sessions’ pod so when session is created, the client will be able to set the date and time, along with a tickbox to select the day. krts8SWP

The post title will be used for session description to tell users what type of session is available.

However,  a few sessions run more than in once a week, i.e. kadets (5-9) are on Monday and Thursday. This is change that needs to be made in Pods Admin area.

Go into the ‘Additional Field Options’ tab of the ‘Weekdays’ field in ‘Sessions’ pod. Change ‘Single select’  to ‘Multiple select’. Also Format of the field can be changed but this time is Checkboxes right.

333

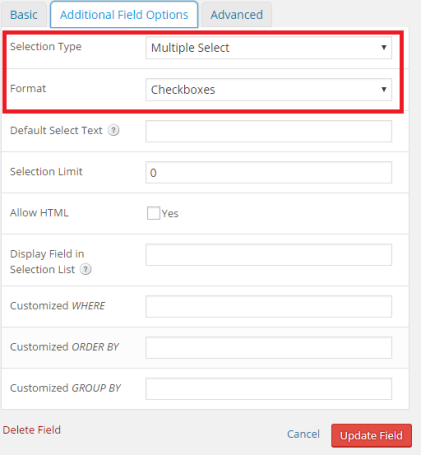
By setting ‘Multiple Select option’ there is no longer a one to many relationship, there is many to many as the same session can run on multiple weekdays.

Now that it is all set up, days of the week need to be created. Go to Pod ‘Weekdays’ and create Monday, Tuesday, Wednesday etc. At the moment all sessions of the club run on all days of the week apart from Friday and Sunday but these two days will be still created as the club may decide in the future to run sessions on them days.

334

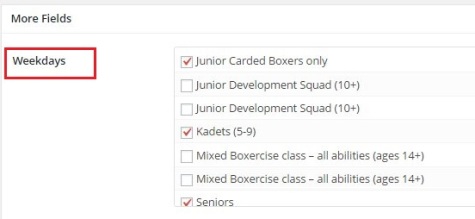
This is what it looks like after opening one of the days –

xv2Ne754

Session tickbox says ‘Weekdays’, it should say ‘sessions’, but this is a small change that can be done any time by editing the label in the pods admin.

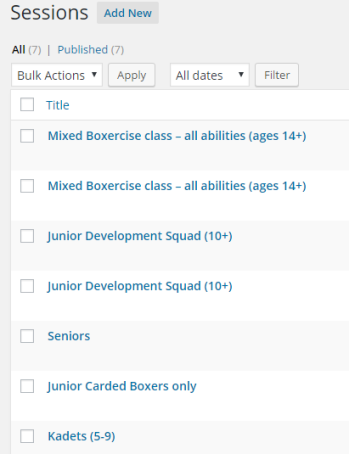
Now, go to ‘Sessions’ pod and create all sessions that are run by the club.

335

However, there are a two sessions that are run on different days in different time therefore, decision to create session with the same name just assign it to different day and time has been made. This is because training times are going to be loop through each weekday. Then, from each weekday, loop through the sessions that belong to that weekday. This means that the right session is going to be pulled in by certain day. Also weekdays are not going to be in alphabetical order therefore this will need sorting out later on.

336

After creating sessions, all the work in back end is done, now it is time to add code in order to display the content.

Creating loop to display the content

This is the code that needs to be add to the code in ‘page-services.php’ –

337

(Source: https://gist.github.com/Shelob9/7832561#file-2-related-fields-example-php)

Copy and paste the code into own code and change ‘pod_name’ to ‘weekday’, ‘relationship_field’ to ‘sessions’ and ‘some_field’ to ‘weekday’ in order to match names of fields and pods with the ones that has been created in Pods Admin.

TqcG1Efm

Save and check the result on the website. However, it is not displaying anything on the website therefore there must be some kind of error. Also noticing that actual days of the week like Thursday – at the bottom, there should be 3 sessions ticked as that is what it is set up in Sessions but there is only one.

O2O9x9ps

Further investigation about why this code is not working and why there are not more sessions ticked in certain weekdays will be done.

Investigation of occurred problems

First of all, lets sort out why there are not more sessions ticked in certain weekdays.

This may be happening because ‘multiple select’ on both sides of the relationship (on weekday and sessions) has not been selected. However, after check, this is not the case as multiple select is on both sides of the relationship.

Next question is ‘What happens after ticking multiple sessions and save, do they just untick after it is saved?’
After testing that, ticked sessions stayed ticked after saving so this suggest that it is working as it should be so this problem is solved.

Next step is to find out why the code is not working.

Go back to code on https://gist.github.com/Shelob9/7832561#file-2-related-fields-example-php and copy it into the file ‘page-services.php’ like it was done earlier.
337

The ‘get_the_id()’ is only there if this is used on a specific page, so delete that and replace it with $params = array(); For now, params will be empty, this should go above $pod = pods( ‘weekday’, $params ); . Pod_name will be replaced with ‘weekday’ as this is name of the pod. ‘relationship_field’ will be replaced with ‘sessions’ and ‘some_field’ with ‘start_time’. Also copy the full line and create new one called ‘end_time’.

$someField = get_post_meta( $id, ‘start_time’, true );
$endTime = get_post_meta( $id, ‘end_time’, true ); Zjx_jmZz

Save the code and check the result.
Unfortunately, it is not outputting anything.

338

Go to https://gist.github.com/Shelob9/7832561#file-1-pods-loop-general-example-php and copy line 9-12 from the code and place it above ‘$related = $pod->field( ‘relationship_field’ );’  –


339

Also the copied code needs ‘s’ removing from variable ‘&pods’ to ‘&pod’ in order to match already existing variable in the code.

Another step is to add curly brackets at the end of the full code because if statement and a while statement was opened when the lines 9-12 were copied and pasted into the code and the statements need to be closed otherwise it will error. Simply add two closing curly braces for both the while and if under the code within the while loop, so it will look like –
340

Save the code and check the result.
Unfortunately, it is still outputting nothing.

Next step is to check if relationships are working. To do that ‘echo $pod->total();’ bellow ‘$pod = pods( ‘weekday’, $params );’ to see if it is outputting any content.

After checking on the website, there was number 7 outputted. However, possibility of having white text showing on white background were there and this could be the reason why there is only number 7 displayed, therefore the viewing source code was necessary to find out if that was the case. Source code contained only number 7 so this was not the case.

This suggested that the relationships may not be working therefore adding ‘var_dump($related);’ under ‘$related = $pod->field( ‘sessions’ );’  This is useful function to check if relationships are working right.

xNw92iu2

Result showed that there is an empty array which suggest that something is broken on the weekday relationship to the session.

Next step is to try and edit one of the weekdays posts in Weekdays pod – for example Monday has been changed to Mond. Go to ‘Sessions’ pod and check if anything changed in field ‘Weekdays’.

yn5gfZpa

It has changed correctly so it looks all fine.

Go to ‘Weekdays’ pod and click on any post to check fields –

yUYipspH

Here is the problem as one of the field has been named incorrectly. Click ‘Pods admin’ on the bottom left, then find ‘Weekdays’. There is a field called ‘weekdays’ which should be called ‘sessions’. Edit that.

Check the result on the website and it should work now –
0h_0nBgd

This is displayed because there is still ‘var_dump($related);’ under ‘$related = $pod->field( ‘sessions’ );’. Delete ‘var_dump($related);’ and it should all work fine –
341

Next step

Make outputted data look like they suppose to –
7YClE2aF

Sources:

Adding images of staff to ‘About’ section with Pods

This is important part as this way images of users will be displayed.

This is what About section looks like at the moment –

302

Images of staff need to be added into red area.

Create a new pod –

274

Fill in information exactly the same way as described in previous posts.

Fields need to be added for this section as every staff has different job role and mobile number.

Click on ‘Add field’ –
303

Fill in fields –
304

Add phone number field and for field type choose phone option –

305

Click on Save button and this is what it looks like after fields has been created –
306

Go to ‘Staff photos section’ that has been just created and click on ‘Add New’ –
307

Fields that has been created are added at the end. Fill in information and click publish.
308

Go to code and add this code –
309

Notice that new variables were created in loop in order to display created fields. Then just simply echo them out.

Save and refresh the page, check the result –
310

Go back to ‘Staff photos’ section and add all members of the staff. Then refresh the page to see result –
311

Services section on home page – making icons dynamic

In the previous posts, possible solution on how to add different images to the service section was discussed however, after trying to add icons dynamically as images, it did not work.

Another way of doing it

The icons are powered by Font Awesome therefore there is different way of pulling them in. To do that, relationship needs to be created. There are different relationships that can be set ‘Custom defined list’ is going to be used.
(To read more, click here)

Go to Pods admin > edit ‘Services’ > edit ‘Icon’.
Under ‘Field type’ choose ‘Relationship’ and then ‘Related to’ – Simple (defined custom field).
In ‘Custom Defined Options’ add exact names of

  • <i class=’fa fa-trophy‘></i>
  • <i class=’fa fa-comments‘></i>
  • <i class=’fa fa-pagelines‘></i>
  • <i class=’fa fa-users‘></i>

324

Template is “value|label” – “trophy|Trophy”
this means “what is in code”|”what user see”

Save it and go to ‘Services’ and add Icon names to each text as required –
325

Go to code and add <i class=’fa fa-<?php echo $type_of_pod->field(‘icon’);?>‘></i> instead of <i class=’fa fa-trophy‘></i>

Now, all icons are pulled in dynamically with CSS. Refresh the page and see the result.

326

Pods – Custom Content Types and Fields plugin/creating services section

Installation

There are two ways of installation –

  1. Manually
    1. Unpack the entire contents of this plugin zip file into your wp-content/plugins/folder locally
    2. Upload to your site
    3. Navigate to wp-admin/plugins.php on your site (your WP Admin plugin page)
    4. Activate this plugin
  2. Installation through admin dashboard – Plugins >> Add New >> and type this plugin’s name

This project is going to install this plugin through admin dashboard.

Go to ‘Plugins’ and click on ‘Add New’ –
269

Type ‘Pods’ in search bar and click enter –
270

Click on ‘Install’ button –
271

Let the Pods plugin install and activate it by clicking on ‘Activate Plugin’ –
272

Pods plugin is all activated and ready to use; shortcut to it is in main navigation –
273

This is what Pods work place looks like –
274

Creating pods – services section

Click on ‘Create New’ and type in what the section will be called; notice that there is singular and plural label – it must be filled in like that. Click ‘Next’.

277

After creating pod called services, the services shortcut will appear on the left.

278

Now, adding field is required in order to add content.

279

Fill it in information and click ‘Add Field’.
280

After clicking on title, this is what will show up and just add required text there –
281

Update it and that is it. Now, the next step is to add code to call out created pod.

This content needs to be call out on the main page in the section ‘Our Services’. Therefore, open ‘front-page.php’ file –
282

There is code calling in another file called ‘content.php’ to display the content. Therefore, open ‘content.php’ file. This is the code –
283

This code will change to –
284

First lane of the opening php code is deleted and replaced with another php code calling in content from the created pod. Loop is created there to make sure that all content will be called out. Name of the pod is stored in variable $name and all the content is stored in variable called $content.

Then those variables are called out in the place where they need to be by adding simple ‘<?php echo $name ?>’.
Refresh the page and check the result –
276

At the moment, there is only one content called out and it is because there was only one field added. Go back to admin section and add as many fields as required and then refresh the page. There is no need to add more code in files as loop was created.

285

Field is successfully published –

286

Refresh the page and check the result –
287

After adding all text there, layout was little bit off the place –
288

This could be because there is no image on left side yet. Adding image is the next step to make the layout correct again.

The layout is correct now, however another problem showed up – icons are all the same and this is problem.

289

This is because loop that has been created to echo out the content in ‘content.php’ file –
290

Template for the content has only one icon set up to be displayed.
The solution will be add icons as images itself instead of displaying them through CSS.

Page Templates in WordPress

Page templates are a specific type of template file that can be applied to a specific page or groups of pages.
(https://developer.wordpress.org/themes/template-files-section/page-template-files/page-templates/)

There are used for changing look and feel of the specific page.

The standard template is usually named ‘page.php’, unless there is a more specific template file available (such as archive.php for an archive page), WordPress will usepage.php to render the content of all pages on your website.
(https://www.smashingmagazine.com/2015/06/wordpress-custom-page-templates/)

This means that if there is file called ‘page.php’ and ‘page-about.php’, WordPress will always look for the one more specific and display that one first.

This is exactly what this project needs as every page of the website has a different layout and at the moment WordPress is using the same template for all pages of the site through ‘index.php’ as it is he main template file.

Creating About page with Page Templates

Create a new file called ‘page-about.php’ to make WordPress think it is a dedicated template file.

Add this code –
262

The name under ‘Template Name’ is what will be displayed under ‘Page Attributes’ in the WordPress editor and it is crucial that this name is justified according to needs of the website.

Copy required code from ‘about.html’ and paste it to ‘page-about.php’ to create required layout of the page. Do not forget to add <?php get_header(); ?> etc.

Once that is done, save the file and go to admin section and open ‘About page’. Notice there that there is a new option called Template –
263

Choose ‘About Page’ and click ‘Update’. Refresh the page and see the result –
264

There is a new layout after clicking on ‘About’ in the navigation.

Next step

Use the same process to customise rest of the pages on the website.

(Sources: https://www.smashingmagazine.com/2015/06/wordpress-custom-page-templates/

https://developer.wordpress.org/themes/template-files-section/page-template-files/page-templates/

https://developer.wordpress.org/themes/basics/template-files/)

Making content dynamic with WordPress

The site that is using ‘Front page’ in Settings in admin –
219

controls what that page looks like and is called ‘front-page.php’. However, ‘index.php’ page is always good to have working as a good back up page.

This is the text that will be displayed dynamically –
220

Open ‘index.php’ and find the code for the text that needs to be displayed dynamically as a loop –
221

Copy the full code that needs to be dynamic and create a new file called ‘content.php’. Paste copied code in the file.

In the place where was the code, type – 222
This is include that has been created to display what is stored in file called ‘content.php’. It works on the same principle as 194.
Go to the website, refresh it and the text should still be there. This means that it is working fine.

Next step

Next step is to add loop and get titles and text adding dynamically.

Process

Go to Google and search ‘The loop’ – https://codex.wordpress.org/The_Loop

This is the code that we are interested in –

223

Copy it and paste it into ‘content.php’ file in the beginning and end.
There is no need to add if statement saying ‘if there is no content, display error message’ because this is a custom theme and some kind of context is always going to be displayed there.

224

Once that is done, delete text that needs to be pulled in dynamically and replace it with 225

which will pull in content and title dynamically.

Refresh the page and check the result –
226

It all works as title and text from home page is displayed there.

Notice that after clicking on navigation, the text is changing –
228

The next step is to save ‘index.php’ as ‘front-page.php’ so that way there are both files there –
227


”Front-page.php’ is now home page and ‘index.php’ is responsible for other pages. It is acting as a template for other pages. However, every page in this project has different layout therefor looking into page templates is needed in order to add add in the customisation for each page.

This is structure of ‘index.php’ in JointsWP –
231

This means that ‘index.php’ needs to look similar to this one.

Open ‘index.php’ file and delete code that is not needed on other pages such as slider at the top is not needed on any other page.
After deleting the slider code, refresh the page. Home page will not change and the slider is still there however, after clicking on ‘About’ in the navigation, the slider is not there anymore –
232

However, rest of the content from Home page is still on every page. The only things that are kept on every page are navigation, sponsors and footer. Rest of the content is different with different layout. This can be customised with Page Templates to make every page look different, which will be done later.

As explained above, there are three things that all pages have in common –

  1. navigation
  2. sponsors
  3. footer

Another thing that rest of the pages have in common is sub header –
233

Therefore adding that section is needed into ‘index.php’ in order to add it to rest of the pages.

Just add the code into ‘index.php’ and refresh the page. This is working however, the same image is on every page which is wrong. This will be changed later on with Page Templates. Also add <?php the_title(); ?> to display title of the page dynamically.
234

Now, changes of titles in admin section is needed as titles are not matching static page. Just simply go to each page and change title of it. Refresh the page and all titles should be correct now.

Mistake

After updating titles of each page, navigation was updated as well –
235

Therefore the decision to keep it as it was before has been made to avoid changing the navigation.

Adding static images into WordPress theme

This theme has background images that do not require to be dynamic.

Go to google and find get_stylesheet_directory_uri – https://codex.wordpress.org/Function_Reference/get_stylesheet_directory_uri

This is what the code looks like that needs to be implemented into the code – 212

First, the logo of the boxing club is going to be added. Open ‘header.php’ file and find code for the logo –
213

Add the code – <?php echo get_stylesheet_directory_uri(); ?>/ into it –
214

Then create ‘images’ file and add all the images into it. Refresh the page and the logo should appear –

215

Follow this step for all images on front page that do not require being dynamic and later on do this for all static images on the full website –

Slider –
216

Join us section –
217

Our sponsors –
218

Notice that there are images missing in ‘Our sponsors’ section and are replaced with icons of images. Those images are going to be added to it later on through Pods.